To update a travel request:
1. From the HR Manager main menu, click Requests under the Travel module. The Travel Request screen will be displayed.
2. Under the Travel Request tab, open the travel request record that you have created.
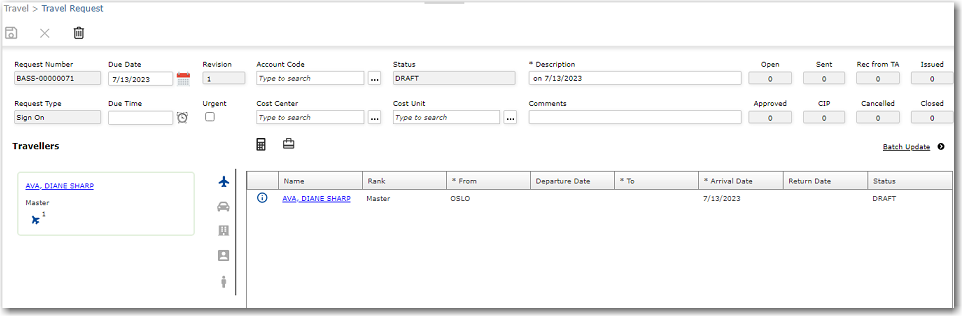
3. The Travel Request screen will then be displayed. On the screen, the Request Number field shows the alphanumeric code that classifies the travel request, the Description field displays the description of the travel request and the Travellers section displays the crew members travelling in the travel request.
4. Ensure that the Due Date is correct and insert a Due Time, if available. You can also select the Urgent check box to indicate that this request is an urgent request.
5. Click the lookup button to select the Account Code, Cost Center and Cost Unit, if available.
6. Insert any relevant Comments related to this travel request.
7. Under the Travellers section, click on the name of the traveller to view their details.

|
Field |
Description |
|
Crew IPN |
The Crew IPN of the crew member. |
|
Name |
The name of the crew member signing on/off. |
| Date of Birth | The date the crew member was born. |
|
Nationality |
The crew member's nationality. |
|
Status |
The status of the travel request record. |
|
Rank |
The rank held by the crew member signing on/off. |
|
Passport No |
The crew member's passport number. |
|
Passport Expiry Date |
The expiry date of the crew member's passport. |
|
Comments |
Enter any comments pertaining to the traveller, if any. |
Note: When viewing the details of the traveller, you can also click the Profiles or Travel Documents link to view their profile or check the validity of their travel documents, respectively.
8. On the right panel, click the Plane icon to display the Flight arrangements.
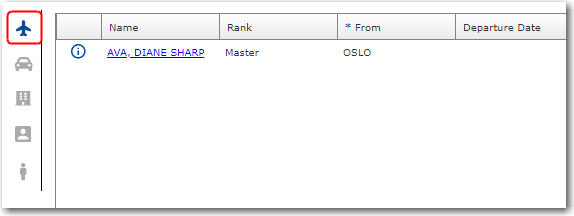
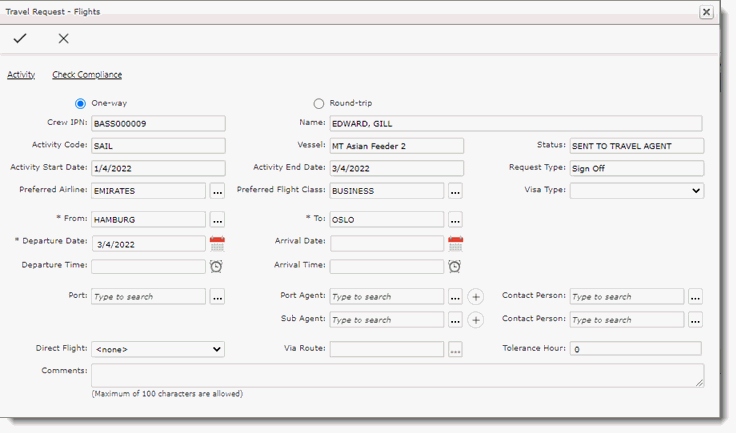
9. To update a flight arrangement, click on the Name to open the flight details for that crew member.
|
Field |
Description |
|
One-way |
Select if there are no Return Flight details. |
|
Round-trip |
Select if the are details of the Return flight. |
|
Name |
The name of the crew member. |
|
Crew IPN |
The Crew IPN of the crew member. |
|
Status |
The status of the travel request record. |
|
From |
Use the Lookup function to select the airport of departure. |
|
To |
Use the Lookup function to select the place of arrival. |
|
Departure Date |
Use the calendar function to select the date of departure. |
|
Departure Time |
Use the time view function to select the time of departure. |
|
Arrival Date |
Use the calendar function to select the date of arrival. |
|
Arrival Time |
Use the time view function to select the time of arrival. |
|
Return Date |
Use the calendar function to select the return date. Only for Round-trip arrangement. |
|
Return Time |
Use the clock function to select the return time. Only for Round-trip arrangement. |
|
Direct Flight |
Select whether the flight is a direct flight or not. |
|
Via Route |
Select an airport if the flight has to stop over en route. |
|
Tolerance Hour |
The number of tolerance hour for the flight. |
|
Preferred Airline |
Choose the airline that the crew member prefers. |
|
Preferred Flight Class |
Choose the flight class that the crew member prefers. By default, the system will automatically display according to the Profiles - Personal Info - Extra Details - Travel Preference - Flight Class field. |
|
Visa Type |
Select the type of visa. |
|
Activity Code |
The code for the crew member's activity. |
|
Activity Start Date |
The start date of the crew member's activity. |
|
Request Type |
The travel request type: Sign On or Sign Off. |
|
Activity End Date |
The end date of the crew member's activity. |
|
Vessel |
The name of the vessel on which the crew member carries out his activity. |
|
Port |
Use the Lookup function to select the port of arrival. |
|
Port Agent |
Use the Lookup function to select the port agent at the port of arrival. Note: Click the '+' icon to add a port agent directly to a Port record. The Port Register that is displayed will be based on the Port you have selected in this record. |
|
Sub Agent |
Use the Lookup function to select the sub agent. |
|
Contact Person |
Use the Lookup function to select the port agent's contact person. |
|
Contact Person |
Use the Lookup function to select the sub agent's contact person. |
|
Comments |
Enter any comments pertaining to the flight arrangement, if any. |
Click OK (the tick icon) to save the flight details.
10. To make Transport arrangements, click the Car icon.
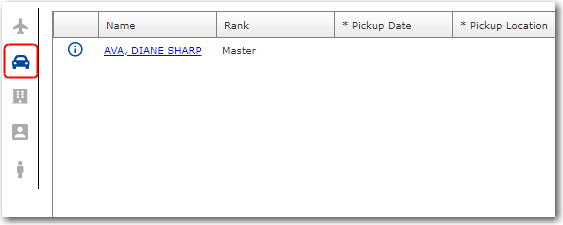
11. Click the + icon below to add transport requests and select the relevant traveller.
12. Then, click the Name to open and update the details of the transportation.

|
Field |
Description |
|
Name |
The name of the crew member. |
|
Crew IPN |
The Crew IPN of the crew member. |
|
Status |
The status of the travel request record. |
|
Pickup Date |
Use the calendar function to select the pickup date. |
|
Pickup Time |
Use the time view function to select the pickup time. |
|
Drop Date |
Use the calendar function to select the drop-off date. |
|
Drop Time |
Use the time view function to select the drop-off time. |
|
Number of Car(s) |
Enter the number of cars required. |
|
Pickup Location |
Enter the location from where to pick up the crew. |
|
Drop Location |
Enter the destination location. |
|
Comments |
Enter any comments pertaining to the transport request, if any. |
Click OK (the tick icon) to save the transport details.
13. To make Hotel arrangements, click the Hotel icon.
14. Click the + icon below to add accommodation requests and select the relevant traveller.
15. Then, click the Name to open and update the details of the accommodation.
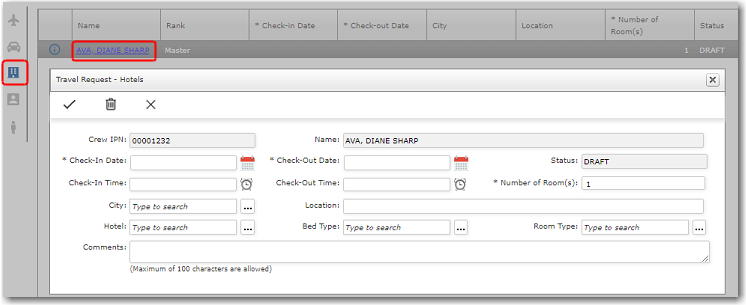
|
Field |
Description |
|
Name |
The name of the crew member. |
|
Crew IPN |
The Crew IPN of the crew member. |
|
Status |
The status of the accommodation request record. |
|
Check-In Date |
Use the calendar function to select the check-in date. |
|
Check-In Time |
Use the time view function to select the check-in time. |
|
Check-Out Date |
Use the calendar function to select the check-out date. |
|
Check-Out Time |
Use the time view function to select the check-out time. |
|
Number of Room(s) |
Enter the number of rooms required. |
|
City |
Enter the City where accommodation is required. |
|
Location |
Enter the exact location of the accommodation. |
|
Hotel |
Select the hotel in which the crew is to stay. |
|
Bed Type |
Select the type of bed preferred by the crew. |
|
Room Type |
Select the type of room preferred by the crew. |
|
Comments |
Enter any comments pertaining to the transport request, if any. |
Click OK (the tick icon) to save the accommodation details.
16. To select the Account for this travel request, click the Account icon.
17. Then, click the Name to open and update the details of the account.
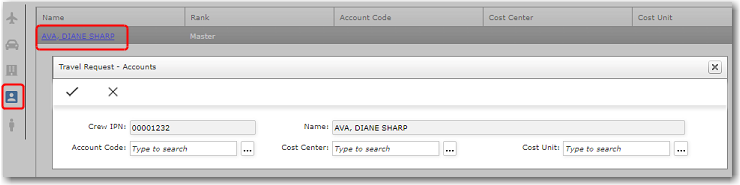
Click OK (the tick icon) to save the account details.
18. In the Agents section, click the '+' icon to select the agents from whom you wish to get a quotation. The Travel Agent pop-up window will be displayed where you can select more than one travel agent. Click OK.
19. Highlight a travel agent and click the Send Email button to send the travel arrangement details to the travel agent for a quotation. An email pop-up window will be displayed where you can amend the details of the email before clicking Send. The email of the sender will automatically be included in the CC/BCC field. The System will then send the email with the booking details directly to the selected travel agent (a valid email address must be specified for this travel agent in the Registers sub module).
If the Travel Agent uses the web-based BASSnet Travel Request Portal, they will be able to receive and manage booking request/details directly in the portal.
Note: The Send Email button will be changed to Send if you select a travel agent that does not require you to send email to book travel arrangements (i.e. ATPI).
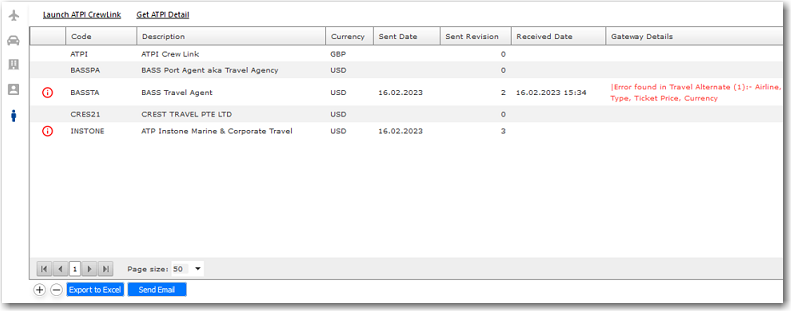
The date the email was sent will then be displayed in the Sent Date column. The Sent Revision column tracks the date of any revised versions of the details that were sent to the Travel Agent. The Received Date column tracks the date the quotation was received from the Travel Agent, while the Gateway Details column displays any errors related to the sending/receipt of the file through the BASSnet Gateway.
Note: With the integration of ATPI or Instone (Maritime Travel Agent), when you click to send an email to the ATPI or Instone travel agent, the System will automatically attach an XML file of the travel information to the email that will be sent out to the travel agent. The travel agent can then specify the quotation details or provide alternate suggestions and transfer the file back to the System via the BASSnet Gateway. The quotation/travel alternate details will then be automatically populated into the Travel Alternates & Comparison screen.
For ATPI, you can also click Get ATPI Detail to manually retrieve information from the CrewLink portal, or click Launch ATPI CrewLink to directly open and access the CrewLink portal.
Alternatively, the travel agent can receive and manage travel requests and booking details via the web-based Travel Request Portal, and the agent can submit quotations through the portal.
Note: If you make any changes at a later time, the ![]() indicator will be displayed. Send the amended details to your selected travel agent by clicking the Send Email button again. A new email will then be sent to the selected travel agent (the revised request will also be visible to the agent in the Travel Request Portal). The System will track the version number once the travel agent sends back an amended travel itinerary. This can be viewed in the Version column on the Travel Alternates & Comparison screen.
indicator will be displayed. Send the amended details to your selected travel agent by clicking the Send Email button again. A new email will then be sent to the selected travel agent (the revised request will also be visible to the agent in the Travel Request Portal). The System will track the version number once the travel agent sends back an amended travel itinerary. This can be viewed in the Version column on the Travel Alternates & Comparison screen.
20 You can also export the travel arrangement details to Microsoft Excel by highlighting a travel agent and clicking the Export to Excel button (the Microsoft Excel file generated will be specific to the travel agent selected in the table). When the details are exported to Excel, the crew details of each crew member will be listed in individual tabs in the Excel sheet.

Click the calculator icon to open the Travel Alternates & Comparison screen, or the bag icon to open the Travel Details screen.