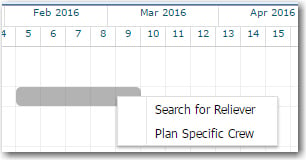
2. The Planning
Overview screen is displayed. On
the Planning
Overview screen,
right-click
a time period in the planner for which you would like to plan
an activity for a crew member.
3. Select Plan
Specific Crew. The Activity
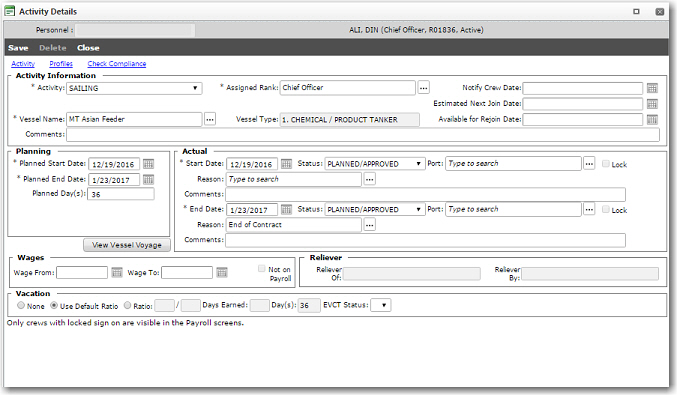
Details pop-up window will be displayed.
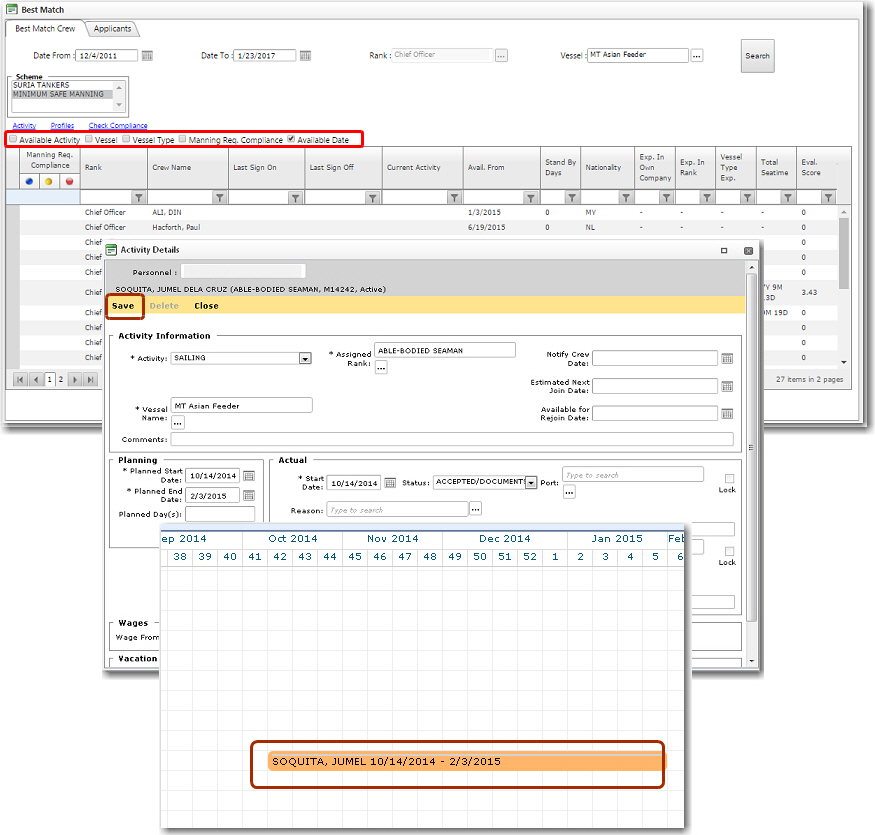
4. In the Personnel
field, enter the name of the crew member for whom you want to
create this activity (note that
when you start typing in the crew name, a list of selections will
be automatically displayed and you can select the appropriate
crew member).
5. After making your crew selection, enter
the details of the activity.
The following table provides you with
more information on the available fields.
Field |
Description |
Activity Information: |
Activity |
Use
the drop-down function to select an activity for the crew
member.
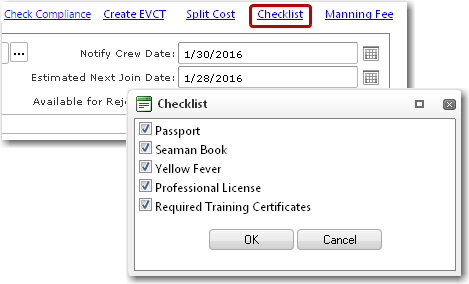
Note:
For Standby Activities: In order to create a standby
activity for a crew member, that crew member must already
have a future planned activity on that same vessel (this
is if this configuration setting has been carried out
in your HRM System). The Checklist
for the future assignment must also have been completed.
The Checklist feature can
be accessed by selecting an Activity record and then clicking
the Checklist
link. Select the relevant check boxes to indicate an item
as being completed:
 |
Vessel
Name |
Use
the Lookup function to select the vessel to which the
crew will be assigned. This should be based on the activity
that you select. |
Vessel
Type |
The
type of the vessel selected in the Vessel
Name field will be automatically displayed. |
Assigned
Rank |
Use
the Lookup function to select the rank the crew member
is assigned for the selected activity. |
Notify
Crew Date |
Use
the Lookup function to select the date the crew member
is notified of his assignment. |
Estimated
Next Join Date |
Application
for 'SAIL' activities. Enables you to select the estimated
date the crew member will be joining the subsequent vessel
after the current activity has been completed. When you
click to auto-create the EVCT, the end date of the EVCT
will be taken from this field as this will be the date
the crew member joins his next vessel. |
Available
for Rejoin Date |
Use
the calendar function to select the date the crew member
is available to rejoin the vessel. |
Comments |
Enter
any comments pertaining to this activity.
Note:
Any comments entered will also be displayed in the pop-up
when you mouse over the crew member's activity on the
Fleet - Crew Planning
- Planning Overview screen. |
Allocation
Type |
This field
will only appear if the 'Allocation'
check box is selected for this activity in the Activity
Register. Use the Lookup to select the allocation
type code to indicate the cost allocation for this activity. |
Planning: |
Planned
Start Date |
Use
the calendar function to select the date planned for the
start of this activity. When the actual sign on takes
place, the Start Date
field should be updated to reflect the actual date. |
Planned
End Date |
Use
the calendar function to select the date planned for the
end of this activity. When the actual sign off takes place,
the End Date field
should be updated to reflect the actual date. |
Planned
Days |
This
field will be auto-calculated based on the Planned
Start and End
Dates entered. |
View
Vessel Voyage |
Click
this button to view the Vessel
Voyage screen. You can select a vessel and then
view the voyage plans created for it. |
Actual: |
Start
Date |
The
actual start date of the activity. |
Status |
Use
the drop-down function to select the status of the crew
in relation to this activity, for example, whether he
is on 'Standby'
for the activity, etc. When a crew member signs on to
the vessel or signs off, update the status to 'Confirmed'.
Note:
If the Global Settings
for the vessel has been set to lock the activity upon
sign on, then Office Users will not be able to edit this
activity once the sign on has taken place UNLESS they
have been granted special
access rights. However, Vessel Users will still
be allowed to edit this activity. Take
note that only crew members with a Locked Sign On will
appear on the Payroll screens.
If
an Office User has been granted special access rights
to overwrite the Sign On/Off, he can select an Activity
record and click either the 'Overwrite
Sign On' or 'Overwrite
Sign Off' link. Depending on your selection, either
the Sign On Special Edit
or Sign Off Special Edit
pop-up window will be displayed:
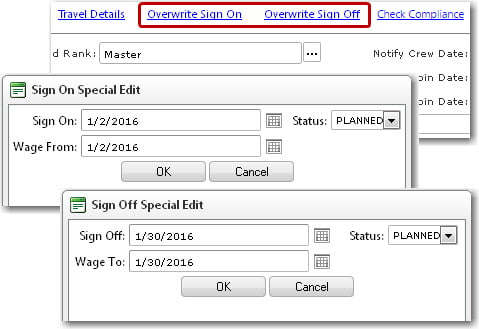
Amend
the dates and status as required and then click OK.
|
Port |
Use
the Lookup function to select the port at which the activity
will begin. This is based on the activity selected. |
Reason |
Use
the Lookup function to select the reason as to why the
crew member is signing on. |
Lock |
Select
the check box to lock the sign-on information to prevent
further editing. Only crew members with a locked sign
on will be visible in the Payroll
module. |
End
Date |
Use
the calendar function to select the actual end date of
the activity. |
Status |
Use
the drop-down function to select the status of the crew
at the end of this activity. |
Port |
Use
the Lookup function to select the port at which the activity
will end. |
Reason |
Use
the Lookup function to select the reason as to why the
crew member is signing off. |
Lock |
Select
the check box to lock the sign-off information to prevent
further editing. |
Comments |
Enter
any comments pertaining to the actual activity. |
Wages: |
Wage
From and To |
Use
the calendar functions to select the appropriate dates.
This information will be synchronized to the Payroll
module. The dates for wage payment will be based on the
dates entered in these fields. |
Not
on Payroll |
Select
this check box if the crew member is not on the company's
payroll. |
| Reliever: |
Reliever
Of |
The
person the crew member is relieving in an activity.
When you
mouse over this field, a pop-up will appear displaying
details of the person the crew member is relieving. A
Profile link is
also available in the pop-up, and clicking this link will
open the respective crew member’s Profile
screen. |
Reliever
By |
The
person relieving the crew member in an activity.
Note:
When you mouse over this field, a pop-up will appear displaying
details of the person the crew member is being relieved
by. A Profile
link is also available in the pop-up, and clicking this
link will open the respective crew member’s Profile
screen. |
Vacation: |
Use
Default Ratio |
Select
this radio button if you would like to use the default
ratio that has already been pre-defined by your company
in the system for earned vacation time. |
Ratio |
Select
this radio button if you would like to specify a ratio
for the calculation of the earned vacation days. The Days Earned field will
be automatically populated based on the ratio entered
while the Day(s)
field will be automatically populated based on the actual
start and
end dates of the activity. |
6. Click Save.
A new time bar will then be displayed on the Planning
Overview screen for this crew member.