Creating a Travel Request for Multiple Personnel

From the Planned Crew Change and Crew Lists screens, you can create travel requests for multiple crew members at one go. This is the first step in making a confirmed travel booking for the selected personnel.

Note: You cannot add a traveller/crew member to an existing Travel Request. To add a crew member, you would need to delete the existing request and then create a fresh request.

Note: Crew members travelling in the same travel pax can have different departure (for Sign On Travel) or return (for Sign Off Travel) airports/dates/time. So when the travel particulars are exported to Excel, the travel particulars of each crew member will be listed in individual tabs in the Excel sheet.

Important Note: You would use the Travel Request feature if you will be utilizing a Travel Agent for the travel booking. However, if you are managing the travel booking by yourself i.e. without using a Travel Agent, you would need to use the Travel Details feature instead.

Click here to learn how to create a travel request for a single crew member.

Jump to topic:


Planned Crew Change screen - Creating a Travel Request for Multiple Crew Members

Screen Navigation: Fleet - Crew Planning - Planned Crew Change

To create a travel request for multiple personnel:

1. From the HR Manager main menu, click Planned Crew Change under the Fleet menu.

2. The Planned Crew Change screen will be displayed. To view planned crew records that are available in the System, specify the date range, Vessel, Port and Creator relevant to the planned crew change and click Search. The result will then be displayed.


Note: Selecting the 'Include Completed' check box will include confirmed crew changes in your search result.

3. Click the planned crew change record that contains the off-signers and on-signers for whom you want to create a travel request.

4. The System will then display the details of the planned crew change and the off-signers and on-signers as planned in the Activity sub module (only crew members with confirmed sign-ons in their Activity records will be displayed in the Off-Signers column).

5. In the table on the Planned Crew Change screen, you can multi-select the check boxes of the crew members who you want to include in the travel request. Once selected, click the Request Travel button.


6. A pop-up message informing you of the newly created travel request will be displayed. Click OK. The travel request record will now be listed under the Travel Request tab on the Requests screen in the Travel module (Travel - Requests).


7. Proceed to the Requests screen in the Travel module and, under the Travel Request tab, click the travel request record that you just created.

8. The Travel Request screen will then be displayed. On the screen, the Request No field shows the alphanumeric code that classifies the travel request, the Description field displays the description of the travel request and the Total Pax field indicates the number of crew members travelling in the travel request.


9. Under the Sign On and/or Sign Off tab, enter information in the following fields:

Field

Description

Sign On tab:

To

Use the Lookup function to select the place of arrival.

Port

Use the Lookup function to select the port of arrival.

Request Date

The date the travel was requested.

Arrival Date

Use the calendar function to select the date of arrival.

Arrival Time

Use the time view function to select the time of arrival.

Port Agent

Use the Lookup function to select the port agent at the port of arrival.


Note: Click the '+' icon to add a port agent directly to a Port record. The Port Register that is displayed will be based on the Port you have selected in this record.

Contact Person

Use the Lookup function to select the port agent's contact person.

Sub Agent

Use the Lookup function to select the sub agent.

Contact Person

Use the Lookup function to select the sub agent's contact person.

Comments

Enter any comments pertaining to the arrival, if any.

Due Date

Use the calendar function to select the date the travel arrangements should be completed.

Due Time

Use the time view function to select the time the travel arrangements should be completed.

Status

The status of the travel request record.

Revision

The number of times the travel request has been revised.

Sign Off tab:

From

Use the Lookup function to select the place of departure.

Port

Use the Lookup function to select the port of departure.

Request Date

The date the travel was requested.

Departure Date

Use the calendar function to select the date of departure.

Departure Time

Use the time view function to select the time of departure.

Port Agent

Use the Lookup function to select the port agent at the port of departure.


Note: Click the '+' icon to add a port agent directly to a Port record. The Port Register that is displayed will be based on the Port you have selected in this record.

Contact Person

Use the Lookup function to select the port agent's contact person.

Sub Agent

Use the Lookup function to select the sub agent.

Contact Person

Use the Lookup function to select the sub agent's contact person.

Comments

Enter any comments pertaining to the departure, if any.

Due Date

Use the calendar function to select the date the travel arrangements should be completed.

Due Time

Use the time view function to select the time the travel arrangements should be completed.

Status

The status of the travel request record.

Revision

The number of times the travel request has been revised.

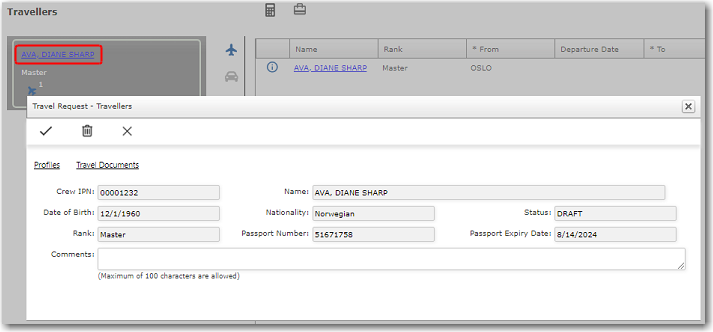
10. The Travellers section displays the crew members that are travelling in the travel request. Click a traveller record to enter further details:


Field

Description

Travellers section under the Sign On tab:

Name

The name of the crew member signing on.

Rank

The rank held by the crew member signing on.

Nationality

The crew member's nationality.

From

Use the Lookup function to select the airport of departure.

Departure Date

Use the calendar function to select the date of departure.

Departure Time

Use the time view function to select the time of departure.

Return

Select the check box to indicate that a return ticket is required.

Return Date

Use the calendar function to select the return date.

Comments

Enter any comments pertaining to the traveller, if any.

Passport No

The crew member's passport number.

Passport Expiry

The expiry date of the crew member's passport.

Activity Code

The code for the crew member's activity.

Date

The start date of the crew member's activity.

Vessel

The name of the vessel on which the crew member carries out his activity.

Travellers section under the Sign Off tab:

Name

The name of the crew member signing off.

Rank

The rank held by the crew member signing off.

Nationality

The crew member's nationality.

To

Use the Lookup function to select the airport of arrival.

Arrival Date

Use the calendar function to select the date of arrival.

Arrival Time

Use the time view function to select the time of arrival.

Return

Select the check box to indicate that a return ticket is required.

Return Date

Use the calendar function to select the return date.

Comments

Enter any comments pertaining to the traveller, if any.

Passport No

The crew member's passport number.

Passport Expiry

The expiry date of the crew member's passport.

Activity Code

The code for the crew member's activity.

Date

The start date of the crew member's activity.

Vessel

The name of the vessel on which the crew member carries out his activity.

Note: When viewing the details of the traveller, you can also click the Activity, Travel Documents or Check License link to view his activity details, check the validity of his travel documents or check the validity of his licenses, respectively.  

Note: Highlight a traveller in the Travellers section and click the Split Crew button to move the selected traveller to a new travel request. This option is only available before the travel request is sent to the travel agent and if there is more than one traveller in the travel request.


11. In the Agents section, click the '+' icon to select the agents from whom you wish to get a quotation. The Travel Agent pop-up window will be displayed where you can select more than one travel agent. Click OK.


12. Click Save at the top of the screen to save all your entries.

13. Highlight a travel agent in the Agents section and click the Send Email button to send the travel arrangement details to the travel agent for a quotation. An email pop-up window will be displayed where you can amend the details of the email before clicking Send. The System will then send the email with the booking details directly to the selected travel agent. A valid email address must be specified for this travel agent in the Registers sub module. If the Travel Agent uses the web-based BASSnet Travel Request Portal, they will be able to receive and manage booking request/details directly in the portal.

The date the email was sent will then be displayed in the Sent Date column. The Sent Revision column tracks the date of any revised versions of the details that were sent to the Travel Agent. The Received Date column tracks the date the quotation was received from the Travel Agent, while the Gateway Error column displays any errors related to the sending/receipt of the file through the BASSnet Gateway.


Note: With the integration of Instone (Maritime Travel Agent), when you click to send an email to the Instone travel agent, the System will automatically attach an XML file of the travel information to the email that will be sent out to the travel agent. The travel agent can then specify the quotation details or provide alternate suggestions and transfer the file back to the System via the BASSnet Gateway. The quotation/travel alternate details will then be automatically populated into the Travel Alternates & Comparison screen.

Alternatively, the travel agent can receive and manage travel requests and booking details via the web-based Travel Request Portal, and the agent can submit quotations through the portal.

Note: If you make any changes at a later time and wish to re-send the amended details to your selected travel agents, you can click the Send Email button again. A new email will then be sent to the selected travel agents. The revised request will be visible to the agent in the Travel Request Portal. The System will track the version number once the travel agent sends back an amended travel itinerary. This can be viewed in the Version column on the Travel Alternates & Comparison screen.

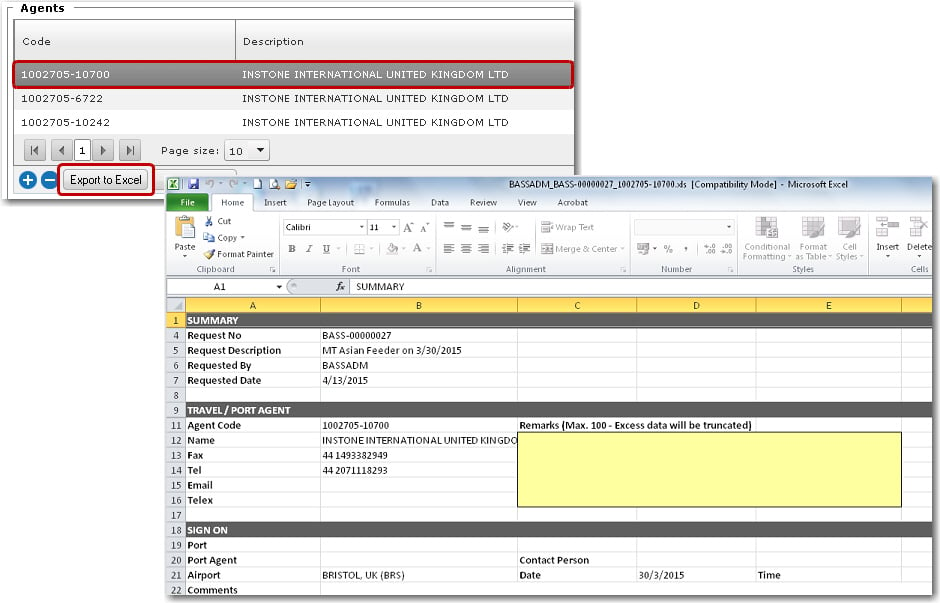
14. You can also export the travel arrangement details to Microsoft Excel by highlighting a travel agent and clicking the Export to Excel button (the Microsoft Excel file generated will be specific to the travel agent selected in the table). When the details are exported to Excel, the crew details of each crew member will be listed in individual tabs in the Excel sheet.


Crew Lists screen - Creating a Travel Request for Multiple Crew Members

Screen Navigation: Fleet - My Vessels - Crew Lists

To create a travel request for multiple personnel:

1. From the HR Manager main menu, click Crew Lists under the Fleet menu.

2. The Crew Lists screen will be displayed. Here you can carry out a search for a list of crew onboard a specific vessel and narrow this search based on a specific time period. The available search criteria are:


Field

Description

Onboard

If you select ‘Onboard’, then only crew members with a ‘Confirmed’ sign on status and a 'Plan' sign off status will be displayed.

Note: The 'From' and 'To' date selection fields will not be displayed on the Crew Lists screen if the 'Onboard' radio button is selected.

All

Select this radio button to display all crew onboard the vessel where their sign on and sign off dates overlap with the time period entered. The search does not check on the Start Status or End Status.

Sign On or Off

Select this radio button to display crew signing on and off from the vessel based on the time period entered.

Sign On Only

Select this radio button to display crew signing on to the vessel based on the time period entered.

Sign Off Only

Select this radio button to display crew signing off from the vessel based on the time period entered.

From Date/To Date

Specify a period for which you want to search for crew either on board the vessel, signing off/on to the vessel or both.

Note: The 'From' and 'To' date selection fields will not be displayed on the Crew Lists screen if the 'Onboard' radio button is selected.

Include All Planned

Selecting this check box will include crew members with planned sign on and sign off statuses.

Vessel

Use the Lookup function to select the vessel for which you want to display a crew list.

Note: After a vessel selection is made in the Vessel field, the Attachment(s) button will then be enabled.


Manning Agent

Use the Lookup function to filter the crew list by Manning Agent.

Pool (Crew)

Narrow your search to a particular crew pool. Click the '+' icon to select the crew pools you want to include.

Nationality

Use the Lookup function to filter the crew list by nationality.

License Status

In this section, the validity of the crew member's license expiration date can be compared to the date selected in the Check Date field, the end date of his activity in the End of Tenure field, or the end date of his activity plus additional days in the End of Tenure + Day(s) field.

Accommodation

In this section, Capacity states the number of crew members the vessel can accommodate, Occupied states the number of crew members currently onboard the vessel and Planned states the number of crew members planning to be onboard.

MR Crew

The number of positions of the vessel's Manning Requirements.

3. Click Search to retrieve a list of crew based on the criteria you have specified.

4. In the Request Travel column, select the S.On (Sign On) and/or S.Off (Sign Off) check boxes of the crew members who you want to include in a travel request. Once selected, click the Request Travel button.


Note: Once a travel request has been created for a crew member, a flight icon will appear in the S.On and/or S.Off sub-column (depending on whether you have created a travel request for a crew member who is signing on or signing off).


5. The Travel Request screen will then be displayed. On the screen, the Request No field shows the alphanumeric code that classifies the crew member's travel request, the Description field displays the description of the travel request and the Total Pax field indicates the number of crew members travelling in the travel request.


6. Under the Sign On and/or Sign Off tab, enter information in the following fields:

Field

Description

Sign On tab:

To

Use the Lookup function to select the place of arrival.

Port

Use the Lookup function to select the port of arrival.

Request Date

The date the travel was requested.

Arrival Date

Use the calendar function to select the date of arrival.

Arrival Time

Use the time view function to select the time of arrival.

Port Agent

Use the Lookup function to select the port agent at the port of arrival.


Note: Click the '+' icon to add a port agent directly to a Port record. The Port Register that is displayed will be based on the Port you have selected in this record.

Contact Person

Use the Lookup function to select the port agent's contact person.

Sub Agent

Use the Lookup function to select the sub agent.

Contact Person

Use the Lookup function to select the sub agent's contact person.

Comments

Enter any comments pertaining to the arrival, if any.

Due Date

Use the calendar function to select the date the travel arrangements should be completed.

Due Time

Use the time view function to select the time the travel arrangements should be completed.

Status

The status of the travel request record.

Revision

The number of times the travel request has been revised.

Sign Off tab:

From

Use the Lookup function to select the place of departure.

Port

Use the Lookup function to select the port of departure.

Request Date

The date the travel was requested.

Departure Date

Use the calendar function to select the date of departure.

Departure Time

Use the time view function to select the time of departure.

Port Agent

Use the Lookup function to select the port agent at the port of departure.


Note: Click the '+' icon to add a port agent directly to a Port record. The Port Register that is displayed will be based on the Port you have selected in this record.

Contact Person

Use the Lookup function to select the port agent's contact person.

Sub Agent

Use the Lookup function to select the sub agent.

Contact Person

Use the Lookup function to select the sub agent's contact person.

Comments

Enter any comments pertaining to the departure, if any.

Due Date

Use the calendar function to select the date the travel arrangements should be completed.

Due Time

Use the time view function to select the time the travel arrangements should be completed.

Status

The status of the travel request record.

Revision

The number of times the travel request has been revised.

7. The Travellers section displays the crew members that are travelling in the travel request. Click a traveller record to enter further details:


Field

Description

Travellers section under the Sign On tab:

Name

The name of the crew member signing on.

Rank

The rank held by the crew member signing on.

Nationality

The crew member's nationality.

From

Use the Lookup function to select the airport of departure.

Departure Date

Use the calendar function to select the date of departure.

Departure Time

Use the time view function to select the time of departure.

Return

Select the check box to indicate that a return ticket is required.

Return Date

Use the calendar function to select the return date.

Comments

Enter any comments pertaining to the traveller, if any.

Passport No

The crew member's passport number.

Passport Expiry

The expiry date of the crew member's passport.

Activity Code

The code for the crew member's activity.

Date

The start date of the crew member's activity.

Vessel

The name of the vessel on which the crew member carries out his activity.

Travellers section under the Sign Off tab:

Name

The name of the crew member signing off.

Rank

The rank held by the crew member signing off.

Nationality

The crew member's nationality.

To

Use the Lookup function to select the airport of arrival.

Arrival Date

Use the calendar function to select the date of arrival.

Arrival Time

Use the time view function to select the time of arrival.

Return

Select the check box to indicate that a return ticket is required.

Return Date

Use the calendar function to select the return date.

Comments

Enter any comments pertaining to the traveller, if any.

Passport No

The crew member's passport number.

Passport Expiry

The expiry date of the crew member's passport.

Activity Code

The code for the crew member's activity.

Date

The start date of the crew member's activity.

Vessel

The name of the vessel on which the crew member carries out his activity.

Note: When viewing the details of the traveller, you can also click the Activity, Travel Documents or Check License link to view his activity details, check the validity of his travel documents or check the validity of his licenses, respectively.  

8. In the Agents section, click the '+' icon to select the agents from whom you wish to get a quotation. The Travel Agent pop-up window will be displayed where you can select more than one travel agent. Click OK.


9. Click Save at the top of the screen to save all your entries.

10. Highlight a travel agent in the Agents section and click the Send Email button to send the travel arrangement details to the travel agent for a quotation. An email pop-up window will be displayed where you can amend the details of the email before clicking Send. The System will then send the email with the booking details directly to the selected travel agent. A valid email address must be specified for this travel agent in the Registers sub module. If the Travel Agent uses the web-based BASSnet Travel Request Portal, they will be able to receive and manage booking request/details directly in the portal.

The date the email was sent will then be displayed in the Sent Date column. The Sent Revision column tracks the date of any revised versions of the details that were sent to the Travel Agent. The Received Date column tracks the date the quotation was received from the Travel Agent, while the Gateway Error column displays any errors related to the sending/receipt of the file through the BASSnet Gateway.


Note: With the integration of Instone (Maritime Travel Agent), when you click to send an email to the Instone travel agent, the System will automatically attach an XML file of the travel information to the email that will be sent out to the travel agent. The travel agent can then specify the quotation details or provide alternate suggestions and transfer the file back to the System via the BASSnet Gateway. The quotation/travel alternate details will then be automatically populated into the Travel Alternates & Comparison screen.

Alternatively, the travel agent can receive and manage travel requests and booking details via the web-based Travel Request Portal, and the agent can submit quotations through the portal.

Note: If you make any changes at a later time and wish to re-send the amended details to your selected travel agents, you can click the Send Email button again. A new email will then be sent to the selected travel agents. The revised request will be visible to the agent in the Travel Request Portal. The System will track the version number once the travel agent sends back an amended travel itinerary. This can be viewed in the Version column on the Travel Alternates & Comparison screen.

11. You can also export the travel arrangement details to Microsoft Excel by highlighting a travel agent and clicking the Export to Excel button (the Microsoft Excel file generated will be specific to the travel agent selected in the table). When the details are exported to Excel, the crew details of each crew member will be listed in individual tabs in the Excel sheet.


What would you like to do?