To create/edit an existing applicant profile:
1. From the HR Manager main menu, click Applicant Profile under the Recruitment menu.
2. In the Applicant search field, search for and load the applicant profile that you want to edit. Under the Personal Details tab, the following fields are available:
Field |
Description |
Prefix |
The prefix to the name, for instance, Mr., Miss etc. |
Suffix |
The suffix to the name, for example, 'Jr.', 'Senior', etc. |
Last Name |
The applicant's surname. |
First Name |
The applicant's first name. |
Other Name |
Use this field if the crew member has any aliases or nicknames. |
Gender |
Use the radio button to select the applicant's gender. |
Date of Birth |
Use the calendar feature to help you select the applicant's date of birth. |
Nationality |
Use the Lookup function to select the applicant's nationality. |
Crewing Agent |
Select the applicant's crewing agent in order to tie this applicant record to a particular crewing agent for access. |
Pool Code |
Select the pool code this applicant is to fall under. |
Availability |
Select when the applicant will be available to report for duty. |
Language Proficiency |
Click the '+' icon to select the applicant's language proficiency level. |
Address |
The applicant's address. |
Country |
Use the Lookup function to select the applicant's country for the address. |
City |
Use the Lookup function to select the applicant's city for the address. |
Contact Details: |
|
Telephone No. |
Enter a telephone number where the applicant can be contacted. |
Mobile No. |
Enter the applicant's mobile phone number. |
Email Address |
Enter the applicant's email address. |
| Preferred Method of Communication | Enter the applicant's preferred method of communication for the company to contact him regarding the application. |
| Preferred Time for Communication | Enter the applicant's preferred time for the company to contact him regarding the application. |
Next of Kin Information: |
|
Name |
Enter the name of the applicant's next of kin. |
Relationship |
Use the Lookup function to select the applicant's relationship to his next of kin. |
Telephone No. |
Enter a telephone number where the applicant's next of kin can be contacted. |
Address |
Enter the applicant's next of kin's address. |
Note: Mouse-over the image placeholder and click Upload to add an image for this profile. Use the Upload Manager to select and upload a profile photo.
3. Click the Licenses/Certificates tab and select a license/certificate Code record in the table to edit the information in the following fields:
Note: The list of licenses and certificates entered in the Licenses/Certificates tab must be relevant to the job applied for.
Field |
Description |
License |
Use the Lookup function to make your selection from a list of available licenses. (The License field cannot be edited and is only enabled when creating a new License record.) |
Description |
The license description will be automatically displayed in the table based on the License selection once the selection is saved. |
Expiry Date |
Use the calendar feature to select the expiry date of the license. |
Status |
Select 'Permanent' if the license has lifetime validity and doesn't require an expiry date selection. |
Note: To add more License/Certificate details, click the 'Click here to create a new record' link to add a new row and select the relevant license.
4. To add attachments to any of the licenses/certificates record, click the attachment link for the selected record.
.jpg)
The Upload Manager pop-up window will appear.
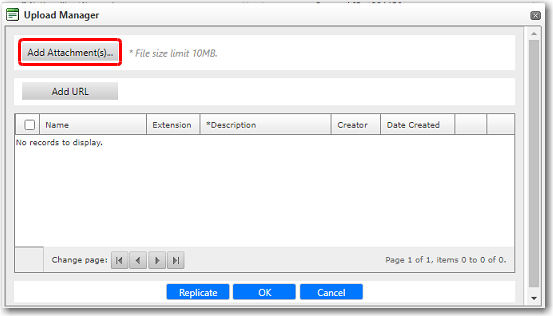
5. Click the Add Attachment(s) button.

6. Browse through your directories and select the file that you wish to upload and then, click Open. (You can select and upload up to 5 different files at the same time.)
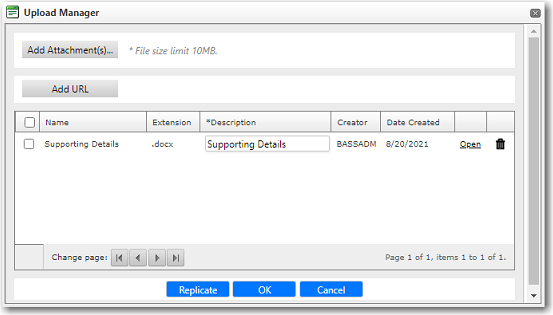
The file will be uploaded and displayed in the Upload Manager's list of records. To view the file, click Open. To upload the file, click OK.
Note: If you want to delete the file, select the file and click the Delete icon (‘trash’ icon). This removes the file from the list.

You can also click the Add URL button to insert relevant or important links.
Note: If the applicant had included attachments under the Licenses/Training tab when filling up the application form, you will be able to access those documents here. If the applicant is hired, these attachments will then also be accessible on the applicant’s new Profile screen under the Licenses/ Certificates tab.
7. Click the Training tab and edit information in the following fields:
Note: The list of courses and training entered in the Training tab must be relevant to the job applied for.
Field |
Description |
Training |
Use the Lookup function to make your selection from a list of available trainings. (The License field cannot be edited and is only enabled when creating a new License record.) |
Description |
The training description will be automatically displayed in the table based on the Training selection once the selection is saved. |
From Date |
Use the calendar feature to select the start date of the training. (The date cannot be edited to select a future date.) |
To Date |
Use the calendar feature to select the end date of the training. (The date cannot be edited to select a future date.) |
Expiry Date |
Select the expiry date of the training certificate. |
Status |
Select 'Permanent' if the training certificate has a lifetime validity and doesn't require an expiry date selection. |
8. Click the Experience tab and enter information in the following fields. This section consists of details pertaining to the applicant's past work experiences:
Field |
Description |
Rank |
Use the Lookup function to make your selection from a list of available Ranks. This is the rank that the applicant held during the particular work experience. |
Description |
The Rank description will be automatically displayed in the table based on the Rank selection once the selection is saved. |
Crewing Agent |
Enter the crewing agent that the applicant was attached to during the past employment. |
Ship Manager |
Enter the name of the ship manager that the applicant was attached to during the past employment. |
From Date |
Enter the start date of the applicant's employment there. (The date cannot be edited to select a future date.) |
To Date |
Enter the end date of the applicant's employment there. (The date cannot be edited to select a future date.) |
Days |
The total number of days will be automatically calculated by the system based on the From and To Dates entered. |
Vessel Name |
Enter the name of the vessel on which the applicant worked. |
Vessel Type |
Use the Lookup function to select the type of vessel on which the applicant worked. |
Main Engine |
Use the Lookup function to select the main engine of the vessel on which the applicant worked. |
Engine Capacity & Unit |
Enter the engine capacity of the machinery worked on and the unit of measurement for this entry. |
GRT, NRT & DWT |
Enter these information in relation to the vessel worked on. |
Note: Click Save after entering all the information when editing a record or adding a new record.
9. Click the Other Info tab. In this section you can enter the applicant's work reference details and any other qualifications that are held:
Field |
Description |
Reference # 1: |
|
Name |
The name of the applicant's first referee. |
Company Name |
The name of the company for which the applicant's referee works. |
Address |
The address of the company where the applicant's referee works. |
Telephone No. |
The telephone number where the applicant's referee can be contacted. |
Reference # 2: |
|
Name |
The name of the applicant's second referee. |
Company Name |
The name of the company for which the applicant's referee works. |
Address |
The address of the company where the applicant's referee works. |
Telephone No. |
The telephone number where the applicant's referee can be contacted. |
Additional Information: |
|
Additional Qualification |
Additional qualifications that give the applicant an advantage in this job application. You can enter up to a maximum of 200 characters in this field. |
Remarks |
Enter any additional remarks pertaining to this application. You may enter up to a maximum of 1000 characters in this field. |
10. Click the Feedback tab. To add a new feedback, click the 'Click here to create a new record' link and type in any feedback regarding this application in the New Feedback field and click Save. The feedback entered will then be listed in the table. To edit a feedback, click a feedback record in the table, make your corrections and then click Save. To delete a feedback, click a feedback record in the table and then click Delete.
11. Click the Status Details tab. Here you may enter details of the interview that was conducted with the applicant. Applicants will only be able to view the positions that they applied for and the current status of their applications, but not the Interview Details table.
Note: Applicants logging in to edit their application may apply for a different position. To apply for a different position, click the 'Click here to create a new record' link and select the Rank position that the applicant wishes to apply for. The Status field will be disabled and defaulted to 'Unprocessed'. Click Save to submit the new job application.
Field |
Description |
Rank |
Use the Lookup function to make your selection from a list of available Ranks. This is the rank that the applicant is applying for. |
Description |
The Rank description will be automatically displayed in the table based on the Rank selection once the selection is saved. |
Status |
Select the status of this application from the drop down list. For example, 'Interviewed', 'Hired', 'Rejected' and so on. This will indicate to the applicant the status of their application. |
Applied Date |
The date the application was submitted. This field cannot be modified. |
Interview Details: |
|
Date of Interview |
Use the calendar function to select the date the interview was carried out. |
Interviewed By |
Enter the name of the person who conducted the interview. |
Comments |
Enter comments pertaining to the interview. This would normally be the evaluation of the applicant as a viable candidate. |
Click Save in the Interview Details section to save the interview details you have just entered. The information will then be displayed in the Interview Details table. To edit a particular interview record in the table, click the interview record and the details will then be displayed. Edit as required and then click Save to save your changes.
12. Under the Personal Details tab, click the Attachment(s) button to upload any relevant documents to an Applicant Profile. The Upload Manager pop-window will then appear. Click the Add Attachment(s) button.
Note: To upload documents pertaining to an applicant's interview under the Status Details tab, click an existing interview record and click the Attachment link in the Interview Details section.

The File Upload window is displayed. Here, browse through your directories and select the file that you wish to upload and then, click Open. (You can select and upload up to 5 different files at the same time.)
The file will be uploaded and displayed in the Upload Manager's list of records. To view the file, click Open. To upload the file, click OK.

You can also click the Add URL button to insert relevant or important links.
Note: If you want to delete the file, select the file and click the trash icon. This removes the file from the list.
13. After completing all your edits, click Save at the top of the page.
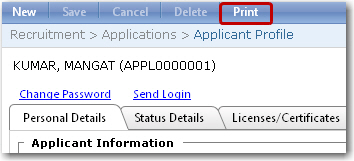
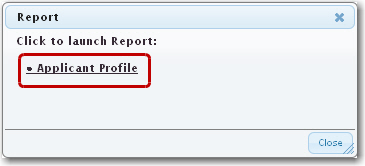
14. To print out this Applicant Profile, click Print at the top of the page. In the pop-up window that appears, click Applicant Profile.


15. The Applicant Profile will then be generated in a format suitable for printing. Click the Print button to send it to your printer.

Note: Applicants logging in to edit their application or apply for a different position their passwords from the BASSnet HR Manager login screen by clicking the Manage Password option, and selecting the Reset Password tab. The applicants can enter their applicant IDs into the User ID field, and click “Send Access Code” to send the access code to their e-mail, based on the applicant’s email address. The applicant will then receive an e-mail with the access code with it, which can be populated to the Access Code field before creating the new password.
