To create a new application:
1. This screen can be accessed either from the HR Manager main menu (Click Job Search under the Recruitment menu) or via a link on a company's website. The List of Posted Job screen will be displayed. Here you will be able to view all available job vacancies in the company. Select a record to view the job details.

On the Job Detail screen, you can click Print Application Form to print out the application form and submit it manually, or you can click Apply to submit your application online, or Login and Apply if you are an existing user. Clicking Print Job Details enables you to print out the details of a specific job (based on your selection).
For the purposes of this lesson, you will learn how to submit your application online.

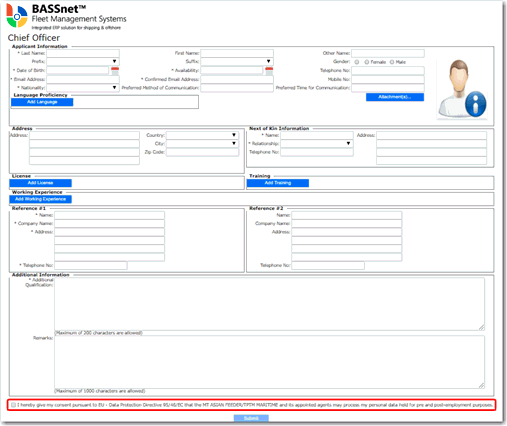
2. Click Apply. The application form will be displayed. As an applicant applying for a position, enter the following information:
Field |
Description |
Applicant Information: |
|
Last Name |
Enter your surname. |
First Name |
Enter your first name. |
Other Name |
Use this field if you have any aliases, nicknames or middle names. |
Prefix |
Enter the prefix to your name. |
Suffix |
Enter the suffix for your name if you have any for example, 'Jr.' |
Gender |
Select your gender from the radio buttons. |
Date of Birth |
Use the calendar feature to help you select your date of birth. |
Availability |
Use the calendar feature to select when you will be available to report for duty. |
Telephone No |
Enter a telephone number where you can be contacted. |
Email Address |
Enter your email address. |
Confirmed Email Address |
Re-type your email address for confirmation purposes. |
Mobile No |
Enter your mobile phone number. |
Nationality |
Use the Lookup function to select your nationality. |
Preferred Method of Communication |
Select your preferred method of communication for the company to contact you regarding your application. |
Preferred Time for Communication |
Select your preferred time for the company to contact you regarding your application. |
Language Proficiency |
Click the Add Language button to enable the fields. Then use the drop-down menus to select your language proficiency. Click Add to add your language proficiency to the application. |
Address: |
|
Address |
Enter your address. |
Country |
Use the drop-down menu to select the country for the address. |
City |
Use the drop-down menu to select the city for the address. |
Zip Code |
Enter the zip code for the address. |
Next of Kin Information: |
|
Name |
Enter the name of your next of kin. |
Relationship |
Use the drop-down menu to select your relationship to your next of kin. |
Telephone No |
Enter a telephone number where the your next of kin can be contacted. |
Address |
Enter your next of kin's address |
Resume/Documents Upload: Click the Attachment(s) button to upload any relevant documents to your application, for example, your resume, certificates and so on. The Upload Manager pop-window will appear. Click the Add Attachment(s) button. The File Upload window will appear. Here, browse through your directories and select the file that you wish to upload and then, click Open. (You can select and upload up to 5 different files at the same time.) The file path will then be displayed in the Upload Manager window. Click Upload. The file will be uploaded and displayed in the Upload Manager's list of records. To view the file, click Open. To upload the file, click OK. Note: If you want to delete this file, select the file and click the Delete icon ('trash' icon). This removes the file from the list. |
|
Note: You can attach a photo of yourself by hovering your mouse key over the image placeholder and clicking the Upload button. Use the Upload Manager to select and upload the photo.
3. In the License/Training sections, click 'Add License' / 'Add Training' buttons respectively to enable the fields and then enter the following information:
Field |
Description |
License: |
|
License |
Use the drop-down menu to make your selection from a list of available licenses. |
Expiry Date |
Use the calendar feature to select the expiry date of the license. Select 'Permanent' if the license has a lifetime validity and doesn't require an expiry date selection. |
Training: |
|
Training |
Use the drop-down menu to make your selection from a list of available trainings. |
From Date |
Use the calendar feature to select the start date of the training. |
To Date |
Use the calendar feature to select the end date of the training. |
Expiry Date |
Use the calendar feature to select the expiry date of the training. Select 'Permanent' if the training certificate has a lifetime validity and doesn't require an expiry date selection. |
Note: The list of licenses and trainings entered must be relevant to the job applied for. The license and training records available for selection are based on the Recruitment Setup carried out.
4. Click Add after entering all the information.
5. Under the License and Training sections, click Attachment(s) to add relevant documents, if any.
The Upload Manager pop-up window will appear.

6. Click the Add Attachment(s) button.
The File Upload window is displayed.
7. Here, browse through your directories and select the file that you wish to upload and then, click Open. (You can select and upload up to 5 different files at the same time.)
The file will be uploaded and displayed in the Upload Manager's list of records. To view the file, click Open. To upload the file, click OK.

You can also click the Add URL button to insert relevant or important links.
Note: If you want to delete the file, select the file and click the Delete icon (‘trash’ icon). This removes the file from the list.
8. To edit a record, click Edit, make amendments and then click Update. To add more license and training records, click the 'Add License' and 'Add Training' buttons respectively to enable the fields to enter new license and training details.
9. In the Work Experience section, click the 'Add Working Experience' button to enable the fields to enter details pertaining to your past work experiences. Enter information in the following fields:
Field |
Description |
Rank |
Use the drop-down menu to make your selection from the available Rank codes. This is the rank that you held during the particular work experience. |
From Date |
Enter the start date of your employment there. |
To Date |
Enter the end date of your employment there. |
Days |
The total number of days will be automatically calculated by the system based on the From and To Dates entered. |
Crewing Agent |
Enter the crewing agent that the you were attached to during your past employment. |
Ship Manager |
Enter the name of the ship manager of the vessel you were on board. |
Vessel Name |
Enter the name of the vessel you were on board. |
Vessel Type |
Select the type of vessel you were on board. |
Main Engine |
Select the Main Engine of the vessel you were on board. |
Engine Capacity |
Enter the engine capacity of the vessel you were on board. |
Unit |
Enter the unit of measurement for the engine capacity. |
GRT |
Enter the Gross Register Tonnage of the vessel you were on board. |
NRT |
Enter the Net Register Tonnage of the vessel you were on board. |
DWT |
Enter the Deadweight Tonnage of the vessel you were on board. |
Note: Click Add after entering all the information. To edit a record, click Edit, make amendments and then click Update. To add another new record, click the 'Add Working Experience' button to enable the fields for new work experience details.
10. In the next section, you can enter your work reference details and any other qualifications that are held. Enter details in the following fields:
Field |
Description |
Reference #1: |
|
Name |
The name of your first referee. |
Company Name |
The name of the company for which your referee works. |
Address |
The address of the company where your referee works. |
Telephone No. |
The telephone number where your referee can be contacted. |
Reference #2: |
|
Name |
The name of your second referee. |
Company Name |
The name of the company for which your referee works. |
Address |
The address of the company where your referee works. |
Telephone No. |
The telephone number where your referee can be contacted. |
Additional Information: |
|
Additional Qualification |
Enter any additional qualifications that you think may give you an advantage in this job application. You can type enter up to a maximum of 200 characters in this field. |
Remarks |
Enter any additional remarks pertaining to your application. You may enter up to a maximum of 1000 characters in this field. |
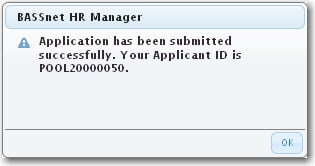
11. After completing all your entries, click Submit.
Note: Please ensure that you have selected the check box to indicate your consent pursuant to the EU's Data Protection Directive 95/46/EC prior to clicking Submit.
12. You will then be provided with an Applicant ID for future reference. Your login ID will be sent to your email address (which you have entered when filling up this form) and you can then use this ID to log in and view or update your application.
Your application form will also be generated in a printable format should you wish to make a print-out.
